(How-To) Deploying Cloud-Init Template with Ubuntu on Proxmox with Ansible Playbook - Part 2

Note… This is a Two Part Post
This is a continuation of the post “(How-To) Deploying Cloud-Init Template with Ubuntu on Proxmox with Ansible Playbook - Part 1”. Check it out if you want to learn more about creating templates manually versus using the Ansible script below.
Difference Between User Data and the Built-in Templating within Proxmox
Before I share the Ansible script below, I want to touch upon the difference between using commands like this:
1
qm set 1234 --sshkeys "/var/lib/vz/snippets/sshkey.pub" --ciuser serveradmin --cipassword "$6$JRsY9F47HwweJbaT$GA619Vj37xThZSm/7NrLh8DkRkISoei05kxSqF3mzH2I/GhZIB1FdmVE6soqgmt5fZqVPwf8Jls.Hjx14Xits1"
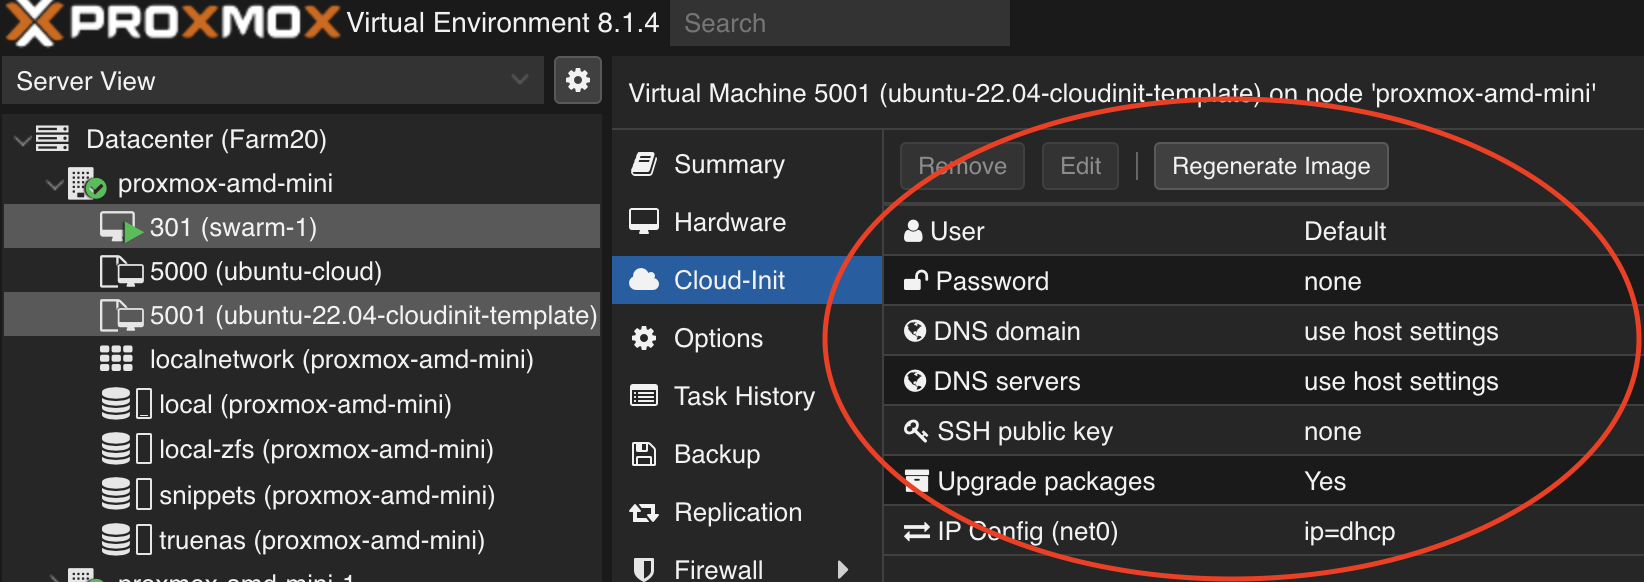
versus using cloud-init user data files. To start off, the command above is leveraging the built-in features within Proxmox, which can also be updated via the GUI: Datacenter -> Host -> Template -> Cloud-Init, as seen in the screenshot below.
For more information on this, take a look at the Proxmox documentation: Cloud-Init FAQ and Cloud-Init Support. My suggestion is to use this built-in feature for quick templates you may want to use for demos or proofs of concept (POCs). However, as mentioned in the previous post, I recommend creating reusable scripts that can be customized and used in source control.
But for more complex use cases that leverage the built-in features of Ubuntu and cloud-init, I highly recommend you bypass the more basic part of the Proxmox integration and refer to this documentation: Cloud-init documentation. Using this allows for the creation of multiple users, custom software installations, and even writing custom configuration files as the machine is being set up.
Focusing on Cloud-Init
Using cloud-init requires at least one extra file, typically based in YAML, and generally called user-data. If you take a peek at the documentation I shared above Cloud-init documentation, you will also see sections for files such as network and meta-data. While I’m not going to cover those here today, they may come in handy if you need to set things like customized DNS servers, namespaces, or even static IPs.
The user-data below will demonstrate how to create a user account, embed the ssh keys for key-based login, allowing for sudo without a password, installing the hwe kernel, and finally the qemu-guest-agent or the virtual machine guest tools.
The user-data.yaml.j2
1
2
3
4
5
6
7
8
9
10
11
12
13
14
15
16
17
18
19
20
21
22
23
24
25
26
27
28
29
30
31
#cloud-config

# Creation of the user account and associated SSH keys
user: {{ ciuser }}
password: {{ encrypted_password }}
ssh_authorized_keys:
  - {{ sshkey }}
chpasswd:
  expire: False
# This section enable's SUDO without a password
users:
  - name: {{ ciuser }}
    sudo: ALL=(ALL) NOPASSWD:ALL
    groups: users, admin
    shell: /bin/bash
# Place distro specific packages here
packages:
  - qemu-guest-agent
  - linux-generic-hwe-22.04
package_update: true
package_upgrade: true
package_reboot_if_required: true
# Ensures qemu-guest-agent is enabled and started. Note that if you have
# "package_reboot_if_required" set to "true" and you are installing
# something like linux-generic-hwe-22.04, this will cause the system
# to reboot. Consequently, the command "systemctl start --no-block
# qemu-guest-agent.service" is not strictly necessary.
runcmd:
  - [ systemctl, daemon-reload ]
  - [ systemctl, enable, qemu-guest-agent.service ]
  - [ systemctl, start, --no-block, qemu-guest-agent.service ]
The above is a Jinja2 template that is being passed variables based on the Ansible variables, both in the secrets.yaml file that I will discuss in a moment, as well as the task to convert a plain text password stored in the Ansible vault, to a hashed password for use in the userdata file. An example of a variable being passed in is signified by the ex: {{ sshkey }}; it’s the {{ and }} that tells Ansible to replace a value with a variable that can be pulled from the playbook.
Ansible Vault
The secrets.yaml file is the next file you will need to customize for your use. If you don’t already have such a file, create one with:
1
ansible-vault create secrets.yaml
This will prompt you to type a password of your choice twice, then you will be brought into Vim (unless you have changed the default), where you will need to create two variables: sshkey and cipassword. I won’t go over Vim commands here, but once you have added your SSH key, which will look something like this: ssh-ed25519 AAAB3NzaC1lZDI1NTE5AAAAI5PCrJ1U83BsqkI1MmQ1RSTUvg7j23eSJ8KQXzZmr0 youremail@yourdomain.com and a password, you can check the contents by running:
1
ansible-vault view secrets.yaml
Your output should look something like this:
1
2
sshkey: "ssh-ed25519 AAAB3NzaC1lZDI1NTE5AAAAI5PCrJ1U83BsqkI1MmQ1RSTUvg7j23eSJ8KQXzZmr0 youremail@yourdomain.com"
cipassword: "a_really_complex_password"
The Files You Need for the Ansible Script
You should now have:
secrets.yamluser-data.yaml.j2
Place these in the directory where you plan to execute the script. Next up, we will discuss the playbook.yml.
Before we proceed any further, if you haven’t ever run an Ansible playbook before, I highly recommend checking out Techno Tim’s video going over the basics of Ansible and running some simple update commands. The video can be found here: Automate EVERYTHING with Ansible! (Ansible for Beginners)
The VARS
Below is the section of the script where you will want to make updates. This is where all the customization should take place. There is no need to change anything below this section unless you have specific needs that aren’t addressed by the customization variables. As this post does not cover such changes, I will not delve into them here.
The variables are broken out into key areas: Proxmox node information, Cloud image settings, VM settings, Template Name, Cloud-Init User Data settings, and Cloud-Init login settings. I have left comments inline to aid in your own changes, but if you have a question, please drop me a line in the comment section below.
1
2
3
4
5
6
7
8
9
10
11
12
13
14
15
16
17
18
19
20
21
22
23
24
25
26
27
28
29
30
31
32
33
---
- name: Prepare Proxmox template with Cloud-Init
  hosts: your-proxmox-node
  become: false
  vars:
    proxmox_node: "your-proxmox-node"
    proxmox_storage: "truenas"  # The storage ID where the images and VMs will be stored; default is "local-lvm".

    # Cloud image settings
    cloud_image_url: "https://cloud-images.ubuntu.com/releases/jammy/release/ubuntu-22.04-server-cloudimg-amd64.img"
    cloud_image_storage: "/var/lib/vz/template/iso"
    cloud_image_name: "ubuntu-22.04-server-cloudimg-amd64.img"

    # VM settings
    vm_id: 5001  # Make sure this VM ID is not in use on your Proxmox.
    cores: 2
    memory: 2048
    resize_disk: 10  # In GB, use this to increase the disk size of the VM.
    QEMU_AGENT: true # Set this to false if you prefer not to use the QEMU agent.
    UEFI: true # Set this to false if you would rather use a non-UEFI image.

    # Template Name
    template_name: "ubuntu-22.04-cloudinit-template" # Name that will show in the Proxmox console.

    # Cloud-Init User Data settings
    user_data_file: "user-data.yaml.j2"  # Make sure this file exists and contains your cloud-init user data.
    user_data_file_storage: "snippets"  # The storage ID where the snippets will be stored; default is "local".
    user_data_file_storage_path: "/mnt/pve/snippets/" # Default is "/var/lib/vz/snippets".

    # Cloud-Init login settings
    ciuser: "serveradmin"
    # cipassword - Stored in a vault file.
    # sshkey - Stored in a vault file.
The Tasks
The Ansible playbook begins by importing necessary secrets for configuration, then moves on to creating a secure, hashed password. A cloud image is retrieved and stored with the proper permissions, setting the stage for VM creation in Proxmox. After ensuring the intended VM ID is available, the playbook proceeds to create a new VM with predefined specifications.
Subsequently, the cloud image is imported as the VM’s disk, and a series of configurations are applied, including hardware settings, initialization with a Cloud-Init drive, and network setup. An SSH key is temporarily stored for secure access, then removed to maintain a clean setup.
The playbook includes tasks for enabling the QEMU Agent, resizing the VM’s disk, and injecting user-defined configurations through a ‘user-data’ file. Optionally, UEFI firmware settings are configured if required. The culmination of the playbook’s activities is the conversion of this newly configured VM into a template, which streamlines the future deployment of additional VMs with identical settings.
1
2
3
4
5
6
7
8
9
10
11
12
13
14
15
16
17
18
19
20
21
22
23
24
25
26
27
28
29
30
31
32
33
34
35
36
37
38
39
40
41
42
43
44
45
46
47
48
49
50
51
52
53
54
55
56
57
58
59
60
61
62
63
64
65
66
67
68
69
70
71
72
73
74
75
76
77
78
79
80
81
82
83
84
85
86
87
88
89
90
91
92
93
94
95
96
97
98
99
100
101
102
103
104
105
106
107
108
109
110
111
112
113
114
115
116
117
118
119
120
121
122
123
124
125
126
127
128
129
130
131
132
133
134
135
136
137
138
139
140
141
  tasks:
    - name: Include vault secrets
      ansible.builtin.include_vars:
        file: secrets.yaml
      no_log: true

    - name: Generate SHA-512 hashed password
      ansible.builtin.set_fact:
        encrypted_password: "{{ cipassword | password_hash('sha512') }}"

    - name: Download the cloud image
      ansible.builtin.get_url:
        url: "{{ cloud_image_url }}"
        dest: "{{ cloud_image_storage }}/{{ cloud_image_name }}"
        owner: root
        group: root
        mode: '0644'
        timeout: 60

    - name: Check if VM ID is in use
      ansible.builtin.shell: "qm status {{ vm_id }}"
      register: vm_status
      ignore_errors: true
      args:
        executable: /bin/bash
      changed_when: vm_status.rc == 0 or vm_status.rc == 1

    - name: Create VM for template
      ansible.builtin.shell: "qm create {{ vm_id }} --name {{ template_name }} --core {{ cores }} --memory {{ memory }} --net0 virtio,bridge=vmbr0"
      args:
        executable: /bin/bash
      when: vm_status.rc != 0
      register: create_vm
      changed_when: create_vm.rc == 0
      failed_when: create_vm.rc not in [0]

    - name: Import the disk to Proxmox
      ansible.builtin.shell: |
        qm importdisk {{ vm_id }} {{ cloud_image_storage }}/{{ cloud_image_name }} {{ proxmox_storage }}
      args:
        executable: /bin/bash
      when: vm_status.rc != 0
      register: import_disk
      changed_when: import_disk.rc == 0
      failed_when: import_disk.rc not in [0]

    - name: Attach the disk to the VM
      ansible.builtin.shell: |
        qm set {{ vm_id }} --scsihw virtio-scsi-pci --scsi0 {{ proxmox_storage }}:{{ vm_id }}/vm-{{ vm_id }}-disk-0.raw
      args:
        executable: /bin/bash
      when: vm_status.rc != 0
      register: attach_disk
      changed_when: attach_disk.rc == 0
      failed_when: attach_disk.rc not in [0]

    - name: Configure add Cloud-Init drive, set serial console, boot order, and network to dhcp
      ansible.builtin.shell: |
        qm set {{ vm_id }} --ide2 {{ proxmox_storage }}:cloudinit --boot c --bootdisk scsi0 --serial0 socket --vga serial0 --citype nocloud --ipconfig0 ip=dhcp
      args:
        executable: /bin/bash
      when: vm_status.rc != 0
      register: cloud_init
      changed_when: cloud_init.rc == 0
      failed_when: cloud_init.rc not in [0]

    - name: Copy ssh key to Proxmox node temporarily
      ansible.builtin.copy:
        dest: "{{ user_data_file_storage_path }}/snippets/{{ vm_id }}.pub"  # Specify the destination path here
        content: "{{ sshkey }}"
        remote_src: false
        owner: root
        group: root
        mode: '0644'
      when: vm_status.rc != 0

    - name: Delete temporarily copied ssh key
      ansible.builtin.file:
        path: "{{ user_data_file_storage_path }}/snippets/{{ vm_id }}.pub"
        state: absent
      when: vm_status.rc != 0

    - name: Enable QEMU Agent
      ansible.builtin.shell: |
        qm set {{ vm_id }} --agent 1
      args:
        executable: /bin/bash
      when: vm_status.rc != 0 and QEMU_AGENT
      register: enable_qemu_agent
      changed_when: enable_qemu_agent.rc == 0
      failed_when: enable_qemu_agent.rc not in [0]

    - name: Resize disk
      ansible.builtin.shell: |
        qm resize {{ vm_id }} scsi0 +{{ resize_disk }}G
      args:
        executable: /bin/bash
      when: vm_status.rc != 0
      register: resize_disk
      changed_when: resize_disk.rc == 0
      failed_when: resize_disk.rc not in [0]

    - name: Copy user-data to Proxmox node
      ansible.builtin.template:
        src: "./{{ user_data_file }}"
        remote_src: false
        dest: "{{ user_data_file_storage_path }}/snippets/user-data.yaml"
        owner: root
        group: root
        mode: '0644'
      when: vm_status.rc != 0

    - name: Attach user-data to VM
      ansible.builtin.shell: |
        qm set {{ vm_id }} --cicustom "user={{ user_data_file_storage }}:snippets/user-data.yaml"
      args:
        executable: /bin/bash
      when: vm_status.rc != 0
      register: attach_user_data
      changed_when: attach_user_data.rc == 0
      failed_when: attach_user_data.rc not in [0]

    - name: Enable UEFI
      ansible.builtin.shell: |
        qm set {{ vm_id }} --bios ovmf --machine q35 --efidisk0 {{ proxmox_storage }}:0
      args:
        executable: /bin/bash
      when: vm_status.rc != 0 and UEFI
      register: enable_uefi
      changed_when: enable_uefi.rc == 0
      failed_when: enable_uefi.rc not in [0]

    - name: Convert VM to template
      ansible.builtin.shell: |
        qm template {{ vm_id }}
      args:
        executable: /bin/bash
      when: vm_status.rc != 0
      register: convert_template
      changed_when: convert_template.rc == 0
      failed_when: convert_template.rc not in [0]
Find the complete scripts and user-data file in the repo: Ansible-Proxmox-Ubuntu-Cloud-Init-Template.
Let me know what you think of this script in the comments below. Help me out by liking the repo or giving it a star.